Thursday 15 October 2015

WW2 German bits and pieces

A general push in the painting department has seen these bits come along with others and help with motivation on generally doing all sorts of stuff. To be honest, I sometimes look at some peoples painting and think why I bother, but these little bits finish up quite nicely, and help gee things along, as well as helping to encourage as they are quickly finished.


Sgts Mess Goulash Kanone, with pneumatic tyres, though it can have wooden spoked wheels. I did a little scratch build pot for the mobile kitchen. A nice piece for just general 'feel' on a table.


An SHQ pak 41/43 88mm A/T Gun. I got this when I went to order/get the M8 turrets, though I had originally intended to get a late war 'Barn Door' 88mm on the cruciform carriage, and Pete didn't have any cast up. Its huge, and I did a bit of fiddling to it, adding a pick and its straps to the gun shield. The 4 figures in the lower picture are SHQ gunners I have included for scale purposes.


From left to right. A Sgts Mess Flak 37 37mm, Grubby Tanks IG18 75mm and an Amercom diecast towed Pak 40 75mm. The Flak 37 was actually labelled as a Maxon quad 50 cal, which I got from them at Bovington - part of the voucher myself and Nick received from Wargames South for the display game we put on. Bit of a shock when I opened the pack, then a challenge to research and make it, as I had no plans. The IG 18 75mm is a must have for my WW2 Germans, a really nice and useful piece of equipment. The Amercom diecast really looks like a Pak38 50mm, not its larger cousin the Pak40 75mm, but that's what it said on the side of the box. It really is a bit too small to be convincing.

The Cavalry are coming

PSC have some really nice, simple and easy to make models in 20mm 1/72 scale, that for the price knock the spots off a lot of other manufacturers, especially of the M5A1 Stuart Light Tank. I had 3 I got earlier, and picked up another 3, with the aim to convert 2 into M8 HMC's. I would use the turret of a M8 Scott HMC from SHQ models, and kitbash it in, something to while away the weekends, as well as being so much lighter than the SHQ model (the only reason for doing this, as there is nothing wrong with their model, except it is metal!!)

The end result is a Light Tank troop, and a pair of Assault Guns for my US Cavalry Group. The newly completed additions.


                                     The whole group, including the previous 3 M5 Stuarts


The only thing that really needs attention now is that I have a lack of M8 Greyhounds and M20 utility cars for the core of the Cavalry group. Also some jeeps, trailers and dismounted personnel are needed to flesh out the Group.

Wednesday 14 October 2015

Colour Sergeant Major William Smith - The Welch Regiment


Colour Sergeant William Smith was my great grandfather. 

I have used the old spelling of Welch, as opposed to Welsh.

Born 4th May 1866, died 23 April 1927.

He joined the 41st (Welch) Regiment of Foot when he turned 18. He is recorded as having served in India, Egypt and the South African Wars 1899 to 1902. He is recorded as being a Sergeant in 1894, a Colour Sergeant in 1899, and a Sergeant Instructor in 1903.


A photo of NCO's of The Welch Regiment. Unfortunately I can't date the photo, or the location where it was taken. It is after 1903, when a notice in the Evening News mentions a Colour Sergeant Smith of the Welch Regiment receiving a GCM medal in August 1903. At his funeral on 27th April 1927, a firing party of the 6th Battalion, The Welch Regiment were in attendance. These were formed from the 3rd Glamorgan Rifle Volunteers in the Territorial Army reforms of 1908. It was noted that he had served in the Army for 32 years.

In July 1881, the Regiment was reorganised under the Childers Reforms, an extension of the earlier Cardwell reforms. These reforms set up the Regimental system of 2 Regular Battalion Regiments (from the 41st and the 69th, becoming the 1st and 2nd Battalions respectively) with 2 Volunteer Battalions (South Wales Rifle Volunteer Corps - known as the Glamorgan Rifle Volunteers) tied in to their newly built headquarters depot - Maindy Barracks -  Cardiff, in their Regimental district. However, the Welsh Regiment received an extra regular cadre battalion (Special Reserve) formed from reservists and volunteers from the Royal Glamorgan Light Infantry Militia with a regular Officer and NCO cadre, and a further 2 Volunteer Battalions to make 4. There were other depots and training sites - for instance the ubiquitous 'Drill Halls', throughout South Wales situated around the home locations of the Volunteer Battalions and Companies of the Welsh Regiment. I have not detailed the 69th Regiment, the 'South Lincolnshire Regiment', which was to become the 41st's brother battalion in the new Welsh Regiment, though they did on occasion meet in passing, as the general policy that brought about the formation of the 2 Battalion Regiments was that one remained at home for defence of the United Kingdom, as the other served overseas as required.


Kildonan Castle - Union Castle Mail SS

In November 1899 the 2nd Boer War broke out with the 1st Battalion stationed at Aldershot. The 1st Battalion and 3rd Battalion Special Reserve and were sent to the Port Elizabeth, Eastern Cape, on the Kildonan Castle to take part in the Boer War. They fought in the relief of Kimberley, the battle of Paardeberg (Bloody Sunday) February 1900, Driefontein in March 1900 and Diamond Hill June 1900. The Regiment were given Battle Honours for the relief of Kimberley, Paardeberg, and the South Africa theatre. They were to stay as garrison troops till 1904.

In the Medal roll for the Welch Regiment, for the 2nd Boer War, Colour Sergeant William Smith is recorded as having served in theatre with the 3rd (Special Reserve) Battalion. This was a composite battalion made from the Reserves and from the Volunteer Companies attached to the 41st Welch Regiment. 

Along with the 1st Yorkshire and 1st Essex the Welsh Regiment was put into the 18th Brigade under Major General T E Stephenson, the 2nd Warwick joining later.  The 18th Brigade took the place of the 12th in the VIth Division, and bore a most distinguished part in the events which turned the tide of fortune.  The work of the VIth Division is sketched under the East Kent Regiment, and that of the brigade under the Yorkshire Regiment.

From the despatch of Lieutenant General Kelly-Kenny of 20th February, relating to the attack on Cronje at Paardeberg:
 "I will take an opportunity of bringing to notice the special acts of devotion to duty on the part of individuals; I confine myself at present to representing the fine spirit and gallantry of all the troops engaged; I feel bound, however, to bring to your lordship's notice now the very gallant conduct of the 1st Battalion Welsh Regiment, who were on our right flank: a portion of the battalion charged right up to the Boer laager with the bayonet in the finest possible manner, losing heavily in their gallant attempt to capture it". 

At Paardeberg the Welsh had 1 officer killed and 5 wounded, 15 men killed and 57 wounded.
On 6th March at Poplars Grove, or Osfontein, the Welsh were again engaged; and on the 10th at Driefontein, or Abraham's Kraal, they had a post of honour.  In his telegraphic despatch of 11th March Lord Roberts says, "The brunt of the fight fell on Kelly-Kenny's division, two battalions of which—the Welsh and the Essex—turned the Boers out of two strong positions at the point of the bayonet".  Various correspondents referred in terms of highest praise to the work of the Welsh.  The Press Association correspondent, in an admirable account wired from the field, after referring several times to the way in which the battalion advanced in face of a heavy fire,—both gun and rifle,— said, "Just before dusk the Welsh Regiment gallantly rushed the position at the point of the bayonet, taking a kopje and clearing a considerable portion of the ridge.  The scene was witnessed by Lord Roberts through a telescope".  The battalion lost Captain Lomax, Lieutenant Wimberley, and 29 men killed, 5 officers and over 100 men wounded.
Six officers and 4 non-commissioned officers and men were mentioned in Lord Roberts' despatch of 31st March 1900.
The battalion was engaged at Leeuwkop, south-east of Bloemfontein, on 22nd April, when they lost Captain Prothero and 1 man killed, and 1 officer and 7 men wounded.
In the advance from Bloemfontein to Pretoria, and thence to the Koomati Valley, the battalion was in the engagements outside Johannesburg and Pretoria, and in the battles at Diamond Hill and Belfast, but had no serious losses.  They were stationed at Godwaan from 4th September till 12th October, and were then sent to Barberton, where they remained till 22nd November, when they were sent to occupy various stations in the Koomati Valley—Krokodile Poort, Nelspruit, Alkmaar, Elandshoek, and Godwaan.  While stationed in this most unhealthy district the battalion was decimated by fever.  In May 1901 the battalion was taken to Johannesburg, remaining there as part of the garrison till March 1902, when they were sent to hold a line of blockhouses from Horn's Nek to Hekpoort west of Pretoria, and they were on this duty when peace was declared.
The battalion furnished a maxim gun detachment with the 1st Mounted Infantry under Colonel Alderson, and a company of Mounted Infantry in Colonel De Lisle's battalion.
In Lord Roberts' final despatch 12 officers and 20 non-commissioned officers and men were mentioned.
In a train incident at Alkmaar on 20th May 1901 a lieutenant, a non-commissioned officer, and a private gained mention for great gallantry; and in Lord Kitchener's final despatch 4 officers and 4 non-commissioned officers were mentioned.
Officers of the 1st Battalion, Welsh Regiment, South Africa
They left in July 1904 to return to barracks in Gravesend. Kent. It was later, in 1909, that the 1st Battalion was sent to Egypt and Sudan. In February 1914 they were sent to India until the outbreak of WW1, where they were ordered back to the UK, heading off to France in January 1915.

Queens South Africa Medal - 1 bar - Cape Colony
Good Conduct - Long Service Medal
Kings South Africa Medal - 2 bars - South Africa 1901, South Africa 1902
Good Conduct - Long Service Medal - Volunteer Forces, small medal and clasp

Thanks to
Peter and Elaine Harries
Simplonpc.co.uk - Kildonan Castle picture
angloboerwar.com Boer War extract and photo
Welsh Regiment Museum

Saturday 18 July 2015

Gyros Teller - Intelligence briefing

The following are the display material that were used in the latest game - Gyros Teller Part IV. They form background and briefing information sourced from Corridor flights, Brixmis, Intelligence intercepts and assessments. Whilst the game is a fictional what if scenario to wargame the Cold War in Central Europe 1986, the photo's and material are from actual Inteligence reports of the period. The map is an extension of the 'what if' given the deployment of the forces involved.


Game introduction showing pre battle photo analysis.


The Game background

The political and military security background. Brixmis were units of the BAOR that were deployed to shadow and report on Warsaw pact troop movements and concentrations during the Cold war. They were over the IGB, as were their Soviet equivalents, situated in the west. Part of the overall monitoring to reduce international tension.


Soxmis - the Warsaw Pact equivalent of Brixmis, would be active prior to any military action to locate and identify potential threats. Even in 'peacetime' their activities would need to be monitored and recorded to identify areas of specific interest to them.


What to expect. The Big 7, a general identification of potential threats from Warsaw Pact forces.


Simple guidelines for reporting missions and battlefield observation. There is a specific section for NBC attacks or strikes.


An overview of general areas of locations and dispositions of  Soviet forces, with Nato Corps boundaries. The map gives the location of our fictional town - Gyros Teller.


This is the Independent Tank Battalion, from 10th Guards Armoured Division. These were new formations, designed to operate independently with a full complement of supporting arms, artillery, infantry and engineers.


Evidence is building up for prospective military operations, as yet unknown given previous reports


Soviet units from 10th Guards Armoured are observed leaving laager areas


Military intelligence is beginning to be severely concerned regarding the activity of Soviet forces


Soviet forces are being located in areas deemed to be concentration areas for an attack west.


An overflight of the IGB has confirmed that Soviet forces have physically crossed the IGB. 


Our map of the area of Gyros Teller, tp show the general dispositions of the units involved in the attack into West Germany.

Gyros Teller is set during the period 1st, 2nd and 3rd February 1986. The games are snapshots taken during those 3 days, in and around the area of Gyros Teller, involving British units, with assistance to and from Belgian and German units. We do not attempt to explain why the 'what if' happened, but I am a confirmed believer in the cockup explanation of history, reading up about Stanislav Petrov and the Able Baker exercise would give you an understanding of the feverish nature that the Cold War got to at times.

Cheers and thanks for reading.


Gyros Teller Part IV

Gyros Teller visited the Tank Museum at Bovington courtesy of an invite from Battlegroup South, who organise a weekend show at the Tank Museum. We were placed in the foyer, just up from reception and the shop, near to the entrance to the main exhibition hall. We had a lot of space for the game and were able to set up a display board next to the table (2 metres by 6 metres) with military intelligence photo's from the period, providing part of the 'legend' for the game. This would be the fourth game in 2 years.


Set in Febuary 1986, the game would simulate an advance on Gyros Teller by 2 separate Soviet Warsaw Pact forces. They would push on via 2 roads to the town, separated by a Corps boundary, to secure bridges over the canal for further independant exploitation by their commands. The attack would be made into the 1st Belgian Corps area, to the south of 1st British Corps area.


Historically, this was considered to be a very likely option for the Soviets should an attack be made over the IGB (Inner German Border), to exploit the relative weakness of the Belgians. Wargames and manoeuvres were tested to reinforce the Belgians with 4th Armoured Division, part of !st British Corps, and these were used to see how the redeployment of 1 Br Corps could be optimised, whilst 1 Be Corps delayed the anticipated attack. Exercise Crossed Swords 1986 being one of these.


The 2 Soviet forces comprised the following; surviving elements of the Recce Regiment from the 3rd Shock Army, a unit used in previous Gyros Teller games, and an Independent Tank Battalion from the 10th Guards Armoured. The Recce Regiment was equipped with T64BV's with reactive armour and the Independent Tank Battalion was equipped with T80's. BMP's and the usual supporting troops would be used, including a Scud!


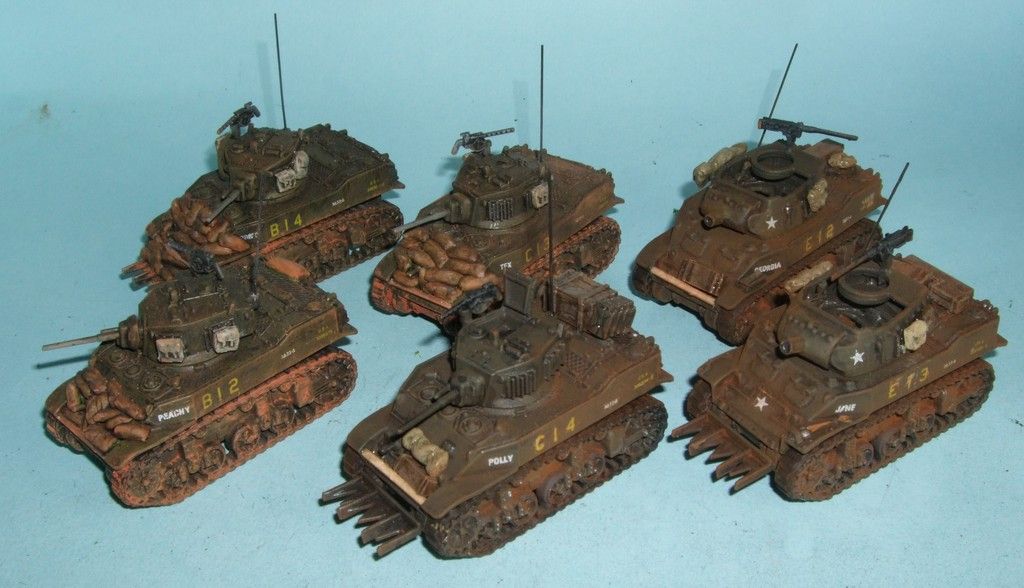
The Belgian forces comprised 7 Leopard I's with 2 Jagdkanone, 2 Scorpions and a Gepard. A local German Reservist unit were supporting the Belgians with 3 M48's and M113's. British forces were 7 Challenger 1's with FV432's and 4 Scorpions and 2 Scimitars. A Blues and Royals battlegroup from 33 Armoured Brigade, supported by the Queens Dragoon Guards -QDG- (using the Scorpions), and Queens Lancashire Regiment -QLR- (providing the infantry component and the Scimitars).


The Soviets had local air superiority, and there would be helicopters and ground attack aircraft available to them. Nato forces would have helicopters deployed, but would not have anything active in the air. Not until local air superiority was taken away from the Soviets. It would remain with the Soviets for the rest of the game.


The 2 lines of approach for the Soviet forces, along the roads described above were separated by a hill feature that effectively isolated the 2 advancing columns, meaning they would not be mutually supporting. A corps boundary ran along this feature. The roads would have truck blockades on them to slow any Soviet advance, but they were not insurmountable. Dozer equipped tanks or ARV's would be able to shift them off the road.


The Belgian forces deployed at the edge of the town, the 2 Jagdkanone's in the centre, with 2 troops of Leopards and the commander deployed to their left and right. The 2 Scorpions were deployed further to the right on the hill to scout forward and report back details. A Gepard provided Anti Air further back in the town. The Belgians did not have any artillery support.


The Germans secured the wooded hill feature alongside the town, which also had the main road going through it, on towards and across the canal. Their tanks were deployed forward, with the infantry setup in the middle of the wood, dug in. They had a light mortar, but no artillery support. They also had a Milan team dug in on the wood edge to interfere with any armour attempting to outflank the wood.


The British were deployed on the table, but in fact if scale was played, were about 20 feet away from the canal. They were replening and refueling, awaiting contact reports and and more detailed information from recce and liaison. The Blues and Royals (Household Cavalry) would deploy via a canal bridge to counterattack the most threatening Soviet advance, or to remove any Soviet presence the other side of the canal.


With the game set up, the Belgians and Germans effectively waited till the Soviets were about a kilometre away before opening fire. As usual, the Belgian Leopard's performed dismally, outshone by their Jagdkanone's. The German M48's did little better. However it was enough to halt the head of the columns and force a tactical deployment, and, as the Soviets expected, draw out the defensive lines around the town.


As the Soviets built up their attack for Gyros Teller, the Belgians and Germans attempted to target the Soviets as they deployed out to attack. Whilst they inflicted casualties, they also received casualties back on the Belgians, directly forcing a withdrawal of one troop from the edge of the town back into it.


As the recce regiment from 3rd Shock Army deployed out, going round a roadblock, extending over the hill in the centre, and flanking the Belgians on the Soviet left, their Forward Air Controller (TACP) called up 2 Mi24 Hinds to engage the Belgians, the Hinds flying in to attack the remaining Belgian Leopards.


This was too much for the Belgians, who were in danger of losing all their kit, and the remaining Leopards began to withdraw, covered by the Gepard, which did damage to one of the Hinds. With the envelopment of the town forcing back the Belgians, and the poor trade off in terms of armour, the Soviets had basically opened up a route to the canal.


As things were hotting up in the town, CO Blues and Royals sent out two patrols to secure the canal bridges and basically find out what was happening in the process. A troop of Scorpions from the QDG was sent up along the road to make contact with the Belgians. They did not expect to find lead elements of the 3rd Shock Army, or their supporting helicopters swarming around the town.


On the other route over the canal, the 10th Guards Armoured's Independent Tank Battalion was forced to deploy out some of its leading infantry to go into the wood on foot, to engage the Germans. Tank support in that area was difficult, and they had 2 options available to them. Primarily, a barrage from a BM21 rocket battery, and a ground attack Su25, to help neutralise opposition from that area.


The Su25 flew up the road, over the wood, and successfully spotted the German positions in the wood - dug in infantry, M113's and M48's.


As luck would have it, CO of the Blues and Royals had earlier decided to send a platoon of the QLR up the road over the canal to the German positions to find out what was going on, and to place a force on the bridge to secure any British counterattack. The QLR had 2 Scimitars from the QDG escorting them. They would be able to call up mortar support.


As the leading Scimitars drove up to the German positions, the Su25 then observed the QLR FV432's, as it began to circle and come in for its attack run. Further Soviet forces were deployed onto the table, as their ARV's cleared the road of wrecks and roadblocks. Things were about to get extremely personal for the German Reservists.


And that was that. An extremely enjoyable game, with a few dice roles. A big thankyou to Richard and his colleagues from Battlegroup South. Firstly for the invite. and secondly for a prize  for the game and the 3 of us directing it - Nick T, Spike and myself.


We met an awful lot of people that we were able to talk to about the game. We had questions about the models and the rules we were using. I will be doing a post about the models. The rules were modified Battlegroup Kursk, and I will put up a full posting of our 'unofficial' modifications. A post of the background information to the game will also be made.


I hope we entertained and didn't bore people. Some of them had even read this blog. Cheers and thankyou.