Friday 6 December 2013

Battlegroup Overlord - Defence of Haye farm

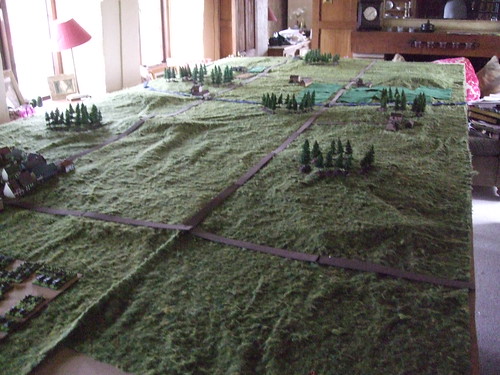
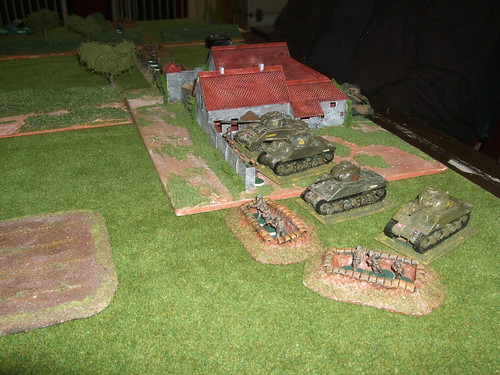
A return match with the Germans who were forced out by the Brits. While the attack on the farm had failed, the advancing Churchills had flanked the farm, forcing the Germans out. The Germans had organised a counterattack on the farm to force the British out and retake the position.


British forces were

senior officer group
1 platoon of infantry
1 troop of Shermans with a Firefly
1 Firefly - the remains of the previous troop
hard defences for all the infantry
reserves - 1 troop of Shermans offtable to come on should events head south.
all aircraft chits drawn would be Allied aircraft - rocket carrying Typhoons

German forces were

senior officer group
1 platoon of panzer grenadiers - in 251's (represented by 250's - sorry)
1 222
1  Flakvierling on a Sdkfz7
1 Marder III m, from the earlier encounter with the British
3 Panthers - these would have poor morale. This was to simulate the new recruit crews who were manning the tanks. The tanks were recovered and repaired from the workshop, poorly trained but enthusiastic replacements put in, to go into the hasty counterattack. All that was available to go into the fight, but brittle.
1 Panzershreck team - heroes of the earlier encounter with the British. Counting as veteran, with +1 to hit and to make cover saves.


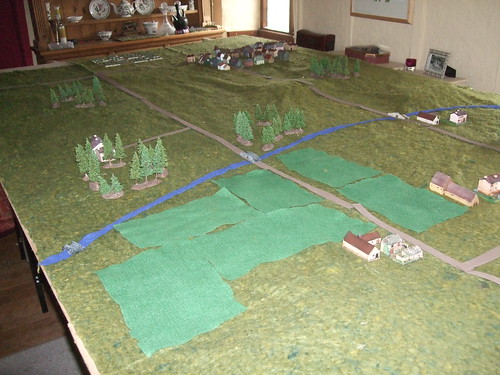
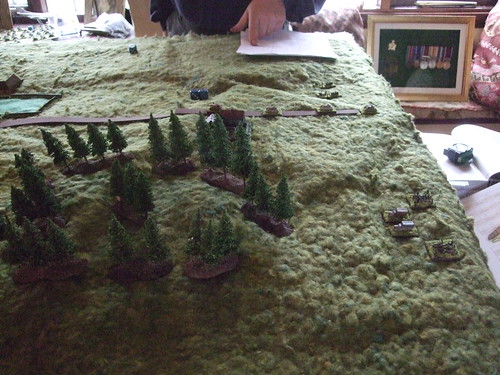
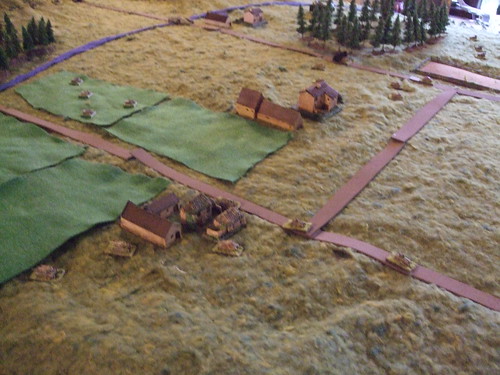
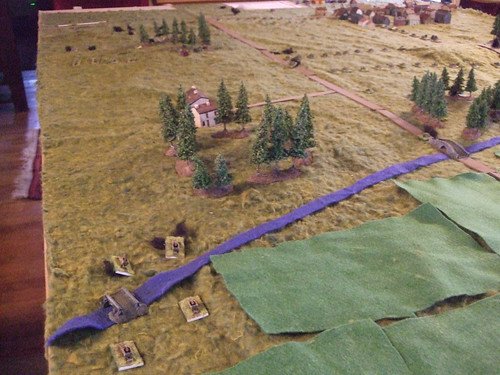
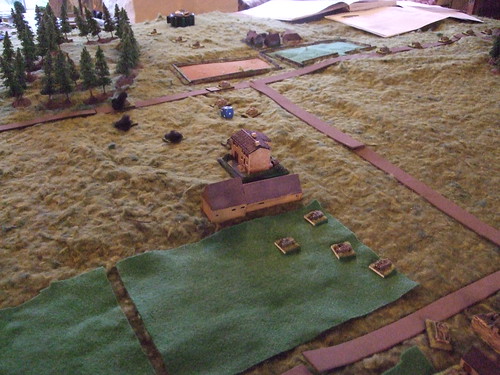
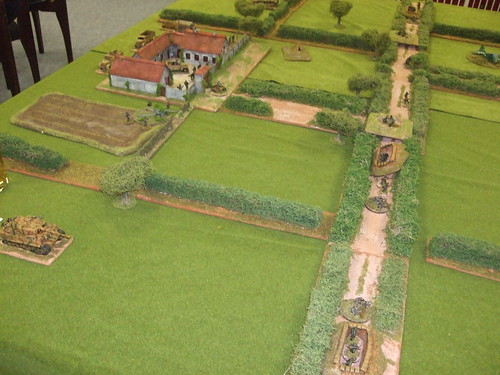
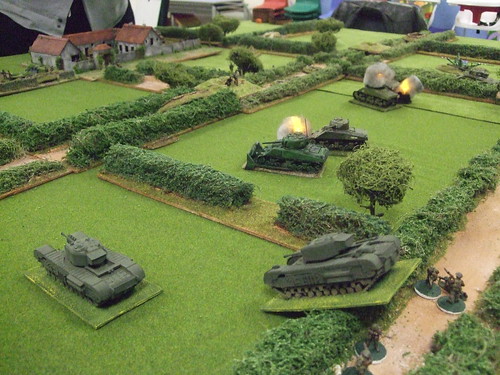
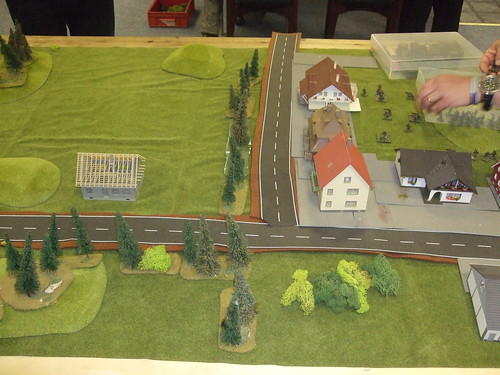
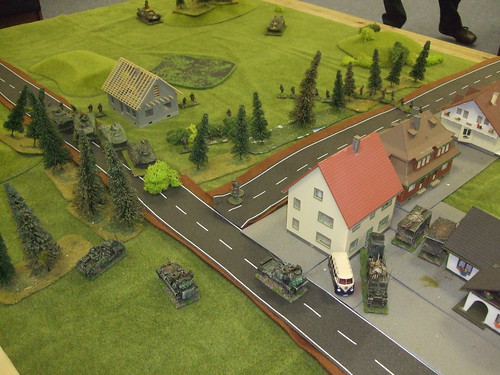
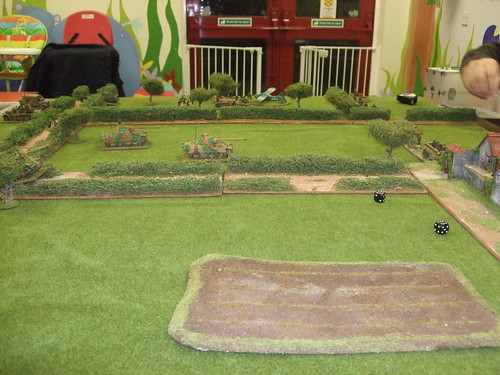
Lieutenant Broomhead formed line behind the mealie bag wall, ready to volley fire on command....er, sorry wrong century and continent. The British deployed the fortifications in a line either side of Haye Farm. I gave it that name as it is an old Airfix La Haye Sainte farmhouse from the Waterloo colllection. The Shermans forming up in line behind the wall and entrenchments. One of the Firefly's lurked behind the back of the farm.

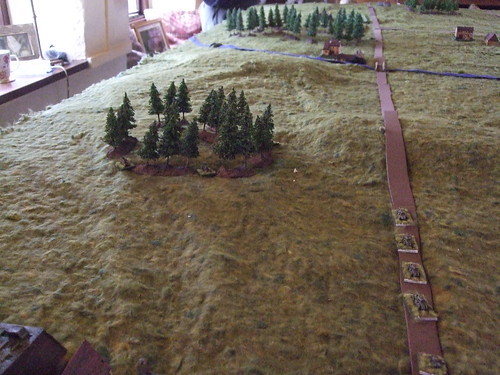
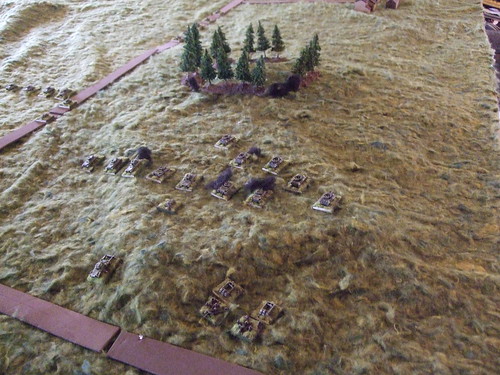
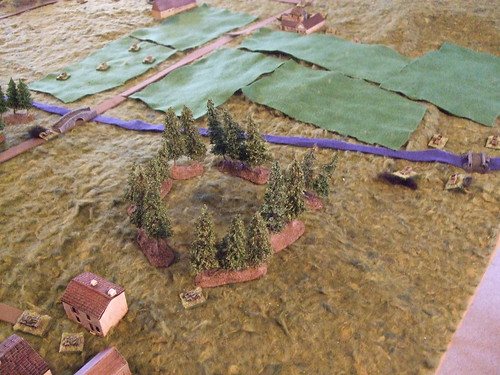
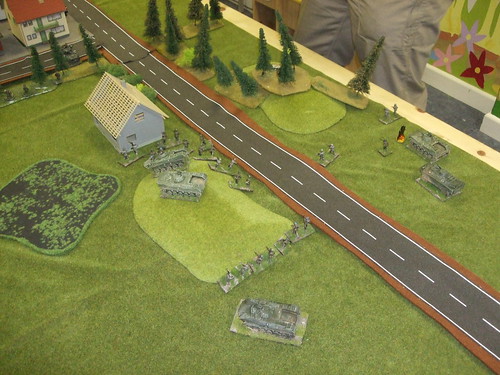
The Germans formed up for the attack, the armoured infantry moving up on the left, through the wood, the Panthers moving straight up the road to the farm. The Marder deployed to the right, supported by the Panzershreck team. The senior officer and Flak behind the hedges , left of centre, the 222 heading along the lane to spot and do recce things.


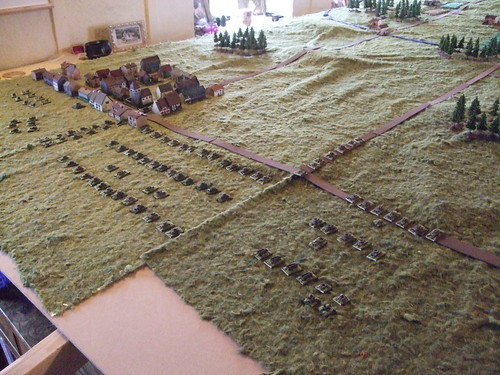
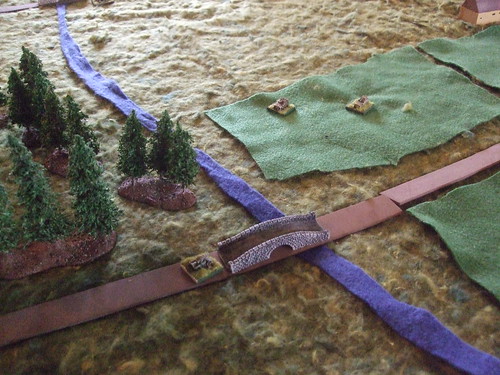
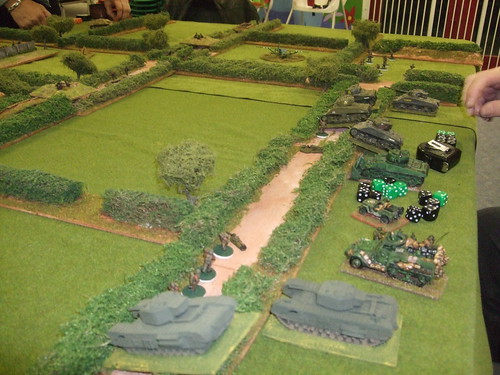
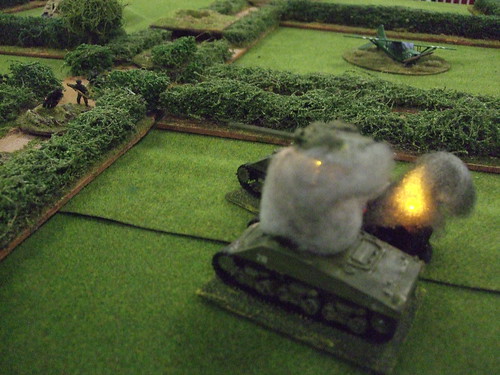
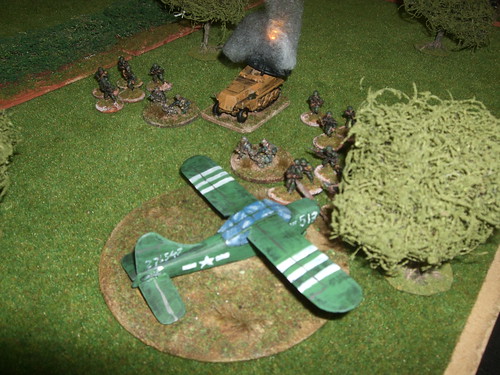
The British held back - holding their lines, allowing the Germans to develop their attack. The Germans Panthers headed off in column down the lane to the farmhouse.  This tempted the British to start to open fire. Whilst missing the leading Panther with a Firefly, the Shermans opened up with suppressive fire on the 222 and Marder, suppressing the 222 ( for the rest of the game, it remained pinned), and converting the suppression to a kill on the Marder. The Germans then drew a chit - low ammo, which they promptly played on the British Firefly. Oouch!


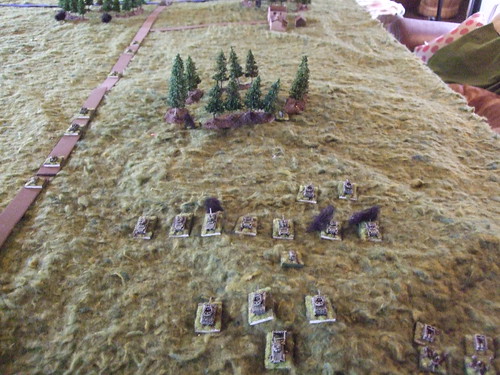
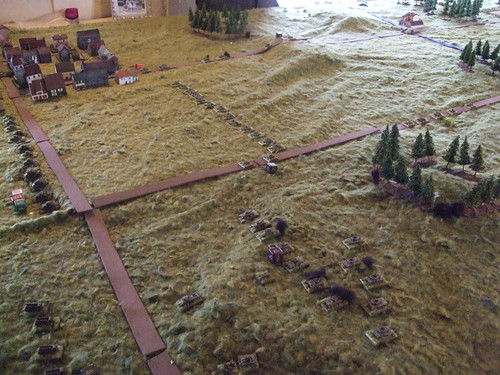
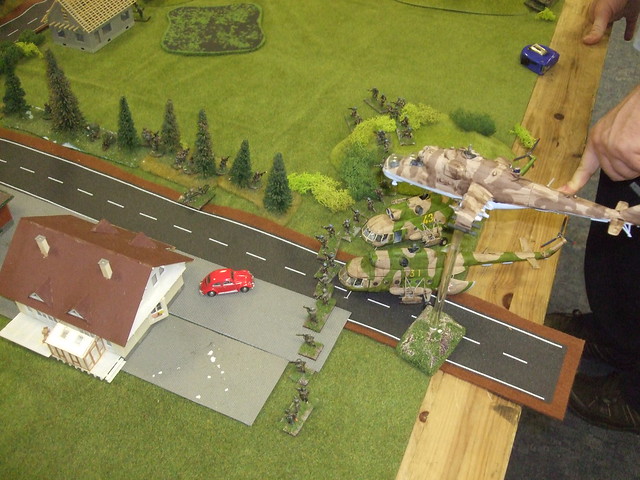
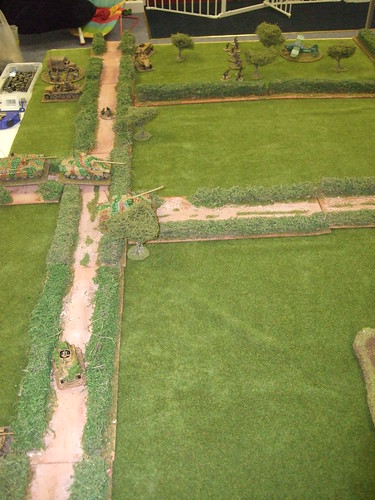
The German halftracks debussed at the edge of the woods, and moved up in support of the infantry squads moving up to attack the positions at the other far side of the woods. The halftracks then began firing suppressive fire at the entrenchments containing the British, and pinning them. The British then spent the rest of the game drawing chits to unpin them whilst they were still there. This was not long as the advancing squads began direct fire into the positions.


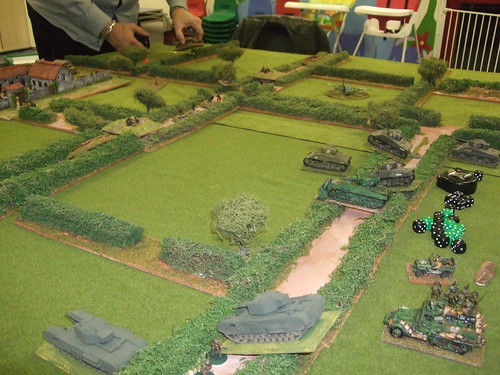
Combined with MG fire from the Panthers who had now left the lane and moved into the field next to the woods, the supporting infantry section became pinned or hit with direct fire. This isolated the infantry from each other and from the tanks in the farm. As the Panthers went on reaction orders/suppression/direct fire and move, this meant that the Shermans and Firefly were very nervous to come out.


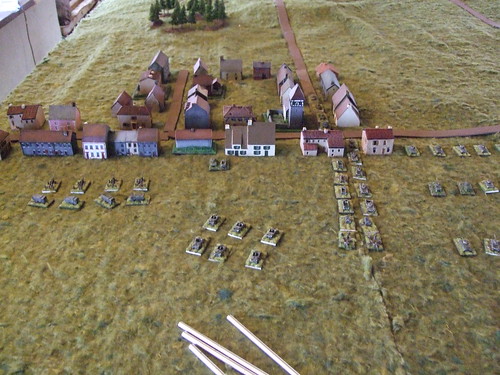
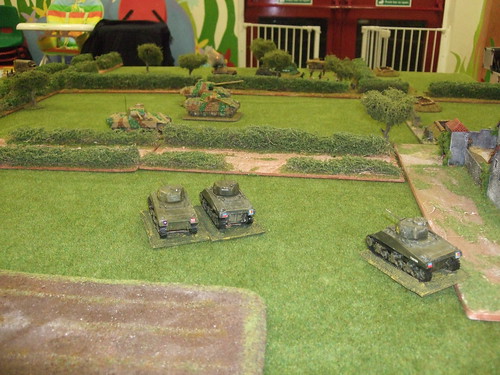
As the Panthers pushed further on, and as the British infantry were wiped out on the right and centre, they exposed their flank to potential attack from the Shermans on the left of the farm.


 But, the first thing you need to do apart from to spot your target, is to hit it. As pointed out in an earlier blog, the critical range is sub 20 inches. If you move, the target moves and they are obscured, that is +3 to a base 4 with a D6 at range 20 - 30 inches. The key is supporting fire from stationary tanks to cover/react to your opponent, and your own tank/troop manoevres. You can sometimes get away with it, but generally you don't.


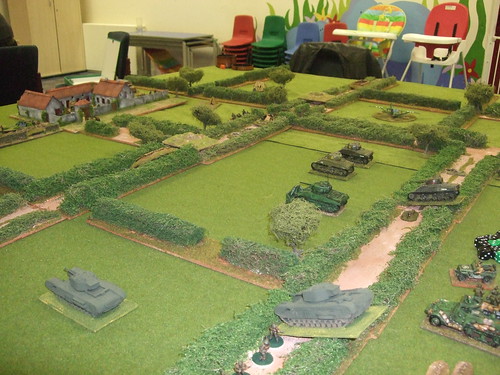
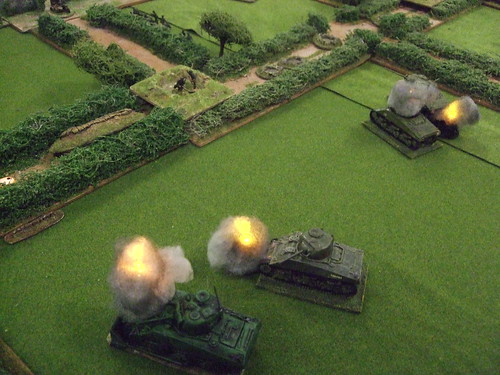
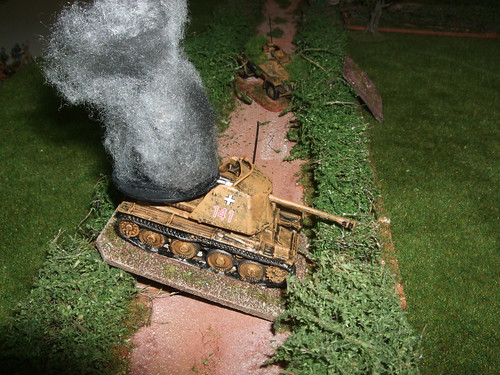
As the Shermans opened up, and missed, it attracted the Panthers attention. Side on hits were the only way that the Shermans would be able to take out the Panthers, apart from immobilising them or getting double 6 etc. The technique would be a combination of reaction orders, fire and movement. The Shermans got lucky, with a side pentrating shot on the nearest Panther.


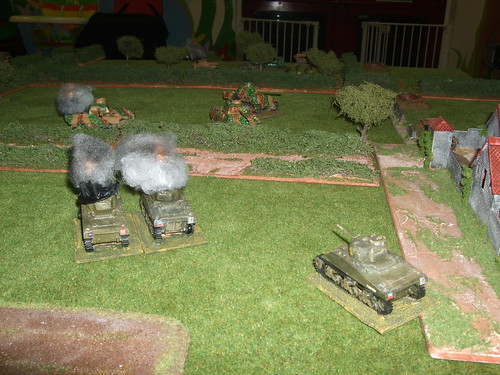
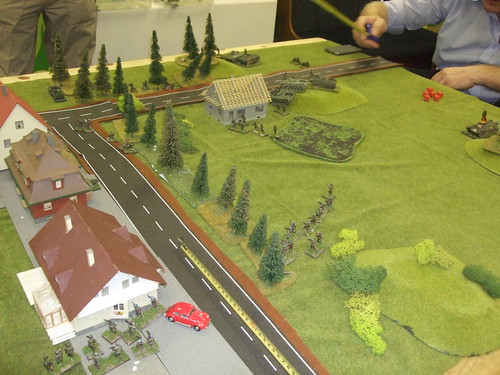
Having wiped out the infantry, the Germans turned to their right, fire then move, taking 2 Shermans with them, and presenting front armour. At the same time, the german infantry had finished taking the entrenchments to their front, swinging right they began to engage the British in the farm. With the 2 Shermans brewing up, the British were 1 BR away from breaking. The lead German squads opened up on the command group mortar team. If they wiped them out, it was game over. If they drew a chit, it would have to be a written chit e.g. minestrike. The MG42 missed twice, the rifle squad didn't. The British drew a 1 and broke.

Thanks to Ian and Dave - British, and Steve - German.

One of the things that came out of the game is to make up some flow charts for sequences of play, what to do etc. I've seen bits on the Guild, and have included an artillery sequence -  http://www.guildwargamers.com/phpBB3/viewtopic.php?f=321&t=30869
I like the QRS sheets, but they are all over the place, trying to fit too much in I think. I don't have the mini rulebook so can't comment on that.


Friday 22 November 2013

Battlegroup Overlord - Push to Caen against 21st Panzer - 6mm

Finally getting going with Battlegroup Overlord, where time and opportunity have finally come together. A big game was set up by Nick T- and in 6mm, with a 14 ft by 6 ft table to play on! A British Yeomanry Regiment would push on from one short side  down the table to the other. 21st Panzer would delay and reinforcements permitting counterattack to stop the push forward. There would be no aircraft in the game.
 
 
There were 2 main road systems down the table, various villages, woods and hills dominating them, as well as a river with 4 bridges over it to negotiate. The first problem would be to work out how to set up the advance with the forces involved and avoid a gigantic traffic jam.


The British forces were as follows
Senior Officer - Regimental command
Yeomanry regiment of 3 squadrons 
2 troops of Divisional Armoured Recce
2 troops of wheeled Recce
1 troop of Achilles
1 troop of towed 17pdr's
1 troop of Churchill's
2 platoons of Armoured infantry
1 platoon of lorry borne infantry
5 artillery observers
2 Sherman flails
2 batteries of 5.5 guns
2 batteries of sexton's
3 pre registered targets

The 21st Panzer had the following that I know about! As we played hidden German movement, I know that there were 2 companies of Piv's, 2 Armoured recce troops, 2 Pak43 88mm's, 2 troops of spg A/T - one of 47mm and the other with 75mm, a troop of 105mm spg's, and a 1/2 track mounted rocket battery. I have a photo, but was really concentrating on other things. These were units that either opened up at me or were spotted when moving.
 
The plan for the advance was for a troop of the wheeled recce to proceed down each road to draw out the fire and spot. The main advance would be by the Yeomanry not on the road, but between the roads, with a wood directly to the front, the bridges over the river either side. Each bridge was covered by on the left, a wood and village the other side of the river, and the same again on the right but this side of the river. Advancing between the roads allowed the yeomanry, supported by a platoon of infantry, to be deployed by Squadron to best effect. The advance up the left hand road would be handled by the Churchills and a platoon of Armoured infantry. The right hand road would host the A/T troops and the Divisional Armoured Recce, supported by the lorry borne infantry. To be honest, the plan was looking a bit thin after having taken the bridges ( if I did manage to). The advance would be tricky to handle and control, possibly slowing the game by being over cautious ( curse of the god like wargamer ), and I might always be reacting to events/ambush. The idea was to pressurize as many bridges as possible and overwhelm the German defences, to force a passage, supported by the artillery. 


Having deployed, off went the wheeled recce, and 3 barrages of art on the pre designated targets. The Armoured recce moved off as well. I sent art observers up with them. Having high 20's with the dice it seemed that I could do whatever I wanted. The problem with handling this size formation was that there were too many things to do. I believe the key is to set up discreet actions that can be fought or conducted that you are able to control. The second part is to set up covering fire for any movement. Even if you are reacting, at least you can react with the cover force, whilst spotting and moving. Apart from a query over the first art barrage - we were able to manage less than 10 mins a turn, playing for approx 3 hours, 4 counting tea breaks. I had 4 very large mugs of tea. You can't play British any other way.

I remember having read Ken Touts books on Normandy years ago, and his thoughts and impressions of his regiment forming up for the attack. They are deeply personal accounts of the period of Normandy and the campaign on to the end of the war. They catch and sum up the the essence of what it was like. Back to the game...
 
 
The recce was able to draw out the spg mounted A/T of the Germans our side of the river. They were hiding in the woods, and casualties started to mount, especially with the Armoured recce. The Churchills were moved up on the left, and the Achilles brought forward to support the Cromwells on the right.


One of the aspects of the game, that Nick brought to it, was the lack of suicidal units taking advantage of the crafty shot. When German units were threatened or about to be overwhelmed, they withdrew back to harden up the defences further back. There was no point to throwing them away to degrade the advancing Brits. This was actually more frustrating - and more real/better - as I did not necessarily see these units, couldn't do anything about them as I had enough to deal with in front of me, and/or didn't have the command effect on the table with the dice to do anything anyway.   


The depth of the game, and its scale helped to do this much better than in 20mm. We also kept the measurements in 20mm scale, but were operating in 6mm. This seemed to work very well as well.
 

Hitting for shooting seemed to bring up a peculiarity, which was that so long as the range was 30 inches or more and the target was moving, you needed a 6 to hit, if you moved as well, then the range had to be 20 inches to 30 inches. This allowed the Shermans to use their numerical superiority. Manoevring at this point, with each squadron supporting the other with move and covering fire allowed them to advance up and eliminate ambushes as they were sprung. Again, I think this was an effect of the table size, and not something that would come up in 20mm games as the ability to do this would be limited by board size - 6 ft by 4 ft deep.


In fact, large games using Battlegroup, on large tables seem to work very well, far better than 20mm. If the opportunity comes up to try a game in 6mm, then it should be taken.

The wheeled recce did their thing as well. Some of the problems with controlling the British, I am sure, were the same for the Germans. There were too many things to do, such as bringing up reinforcements. Also, opening fire onto the pesky armoured cars was an easy shot/kill, but revealing positions to the advancing forces. The ideal role and function of the recce forces. Playing games in 20mm, tend not to allow you to do this. Its straight into combat move one, you're being shot at, or avoiding being shot. Perhaps the size and balance of forces may be the reason for this, as well as terrain. Sorry if this sounds like a eulogy for 6mm.

Artillery I thought might be dominant in the game, but the investment in command dice was just too great to keep up with the events happening on the table. Especially after the first round - I failed the next 3 turns of artillery requests, never getting past the radio check. Nick used a single barrage from the halftrack mounted rockets of 21st Panzer. I had some of my observers forward, one with the Armoured recce, and in both groups of armoured cars. We didn't have artillery off table, but used on table artillery. For the British, 4 5'5 tubes and 6 25 pdr tubes was a quite substantial supporting force. Direct HE fire, which a battery of 105mm spg's of the Germans did, seemed better use of the guns than in indirect fire.
 

I think that the problem with the artillery was the quantity, and the type of artillery support requested. The priority calls are the best method of getting support, and the most flexible and cheapest off table support are the mortars. The fact that unit commanders can call for support as well as your artillery observers is a cost bonus as well when constructing a battlegroup for the table. Communication bonuses are a must - dispatch riders, wire teams, radio vans and being US, for help with the dice rolls!

Thanks to Nick for the invite and great game.


Battlegroup Overlord - Introductory game , British vs Germans

A very simple game was set up for 2 of the regular KGN players to introduce them to the new and different mechanics of Battlegoup. Although first appearances to the contrary, the 2 sets are very different. Namely the Reaction orders, unit orders and some of the minor mechanisms of play. Errr... also price, layout, scenario's, troop/unit functions...

The game would not be point based, but would be set up to produce a side that should be able to complete their objective, and have sufficient troops to do this - British. Their opponents - Germans, had limited forces but would be on the defense. No artillery would be used, as this would be a kind of encounter and the idea was to keep it simple.

British forces were as follows
Senior Officer - command halftrack and a jeep
Platoon of infantry
Troop of 4 Shermans inc a Firefly
Troop of 3 Churchills
Sherman with a Dozer blade attached to the Sherman platoon

German forces were as follows
Senior Officer - command group with radio van, side car, staff car and Kubel
Platoon of infantry
2 HMG's
1 20mm  Flak on a ground mount
1 Pak 40 75mm
1 Piv
1 Marder
emplacements for 2 sections of infantry, Pak 40 and the 2 HMG's

I put in a game rule which was that the Piv with Schurzen would be represented by a Tiger tank on the table, as would the Marder be represented by a Jagdpanther. This was to represent a bit of Tiger fever. However, if the vehicles were obscured and the spotting roll was a 6  at over 20 inches, they would have a chance to be correctly identified. Under 20 was 5 or 6, under 10 was 4,5 or 6. If spotted in the open, they would be correctly identified.


The terrain was farmland around a farm that comprised the centre of the German defences. Hedges would provide soft cover, emplacements and walls hard cover. Infantry could move across the hedges, tanks would have to roll a d6 deduction on their movement to cross, the Dozer equipped Sherman would roll a d6 deduction but move straight through the hedge creating a gap.

The Germans deployed along the centre of the board, 2 sections in emplacements supported by a HMG at either end. The 3rd section on their left lurking in the lane behind a hedge. The Panzerscreck teams were at the road junction to deploy where needed. The Marder was deployed behind the 3rd section, with the Piv on their right, in the open, but obscured by hedges to their front. The Pak 40 was covering the road and field to the front of the farm with the platoon HQ, senior officer behind the farm, and the 20mm at the edge of the farm.

The British deployed all the infantry in the lane, their senior officer and transport behind the lane. The 3 Churchills were deployed on their left, then the Sherman Dozer, and the remaining Shermans to the right.

British moved off from the lane, sending the infantry forward in front of the tanks, who were struggling to cross the hedges. The Churchills were having a horrendous time, taking several moves to eventually to get across. The Shermans were more successful, but with the infantry out to their front, the British infantry took a dreadful shellacking from the remaining German troops in their emplacements before the tanks could engage.
German casualties were spread through the line of defences, but they lost a section and a HMG to the firing. After losing 2 sections of infantry the British only had infantry on the left, supporting the Churchills. With the lack of infantry, the Shermans moved across the front, veering to the left, away from the German infantry coming across the line from their left. However, they did not move far enough away from the Panzershreck teams at the crossroads. The right hand
Shermans engaged the teams with direct fire killing one team, but the other team passed all its cover saves when it received hits. That was, if the British could spot it - they consistently rolled 1's and 2's for observation spotting for their direct fire.


This then produced something that I have not seen in any game I've ever played. The surviving team kept making its saves whilst putting 2 shots into the 2 Shermans destroying them both. They then moved along the lane to engage the other 2 Shermans, and with 2 shots destroyed both of those as well.


The Firefly was slowly making its way up the lane to the farmhouse, but was nervously expecting the Jagdpanther to engage it. The Jagdpanther was not visible to anything on the table, but the effect it had was significant, I think. Not the effect that a Marder would have had.


The Churchills moved forward with the infantry behind, but trying to engage the Tiger, could not get a hit, apart from one which failed on penetration. The penetration was against Piv armour, and failed completely though Ian wasn't told this, rolling 4 on the dice said it all . Likewise the Tiger could not get any hits on the Churchills.


                                                              The only possible anti tank that could have got a result would have been the legendary Panzershreck team moving along the lane from brewing up the 4 Shermans.

                                                                                                                                          A very good, enjoyable game, with quick and fluid turns, and the opposite of the game I set up some time ago as an introduction to KGN. I learnt a valuble lesson in not trying to pack too much into a game no-one had played before. Thanks to Ian ( British ) and Mike (German ).


Friday 8 November 2013

Stinson L4 Sentinel - Part 2

A spurt of creative energy, and some preparation has pushed the project along. I pre-drilled the wings for supporting brass wires, fitted through the cockpit. I had got some plastic rod for the wing supports, and worked out how I would do them to show the original supports.


I took some plastic rod, cut to size, and then filed both side to flatten them. I then cut the joining spar, and glued them up.


Taking the wings, and glueing them onto the brass rods. A bit of a mess really, as drilling the wings for the rods, the drill melted the plasticard. What a palaver! Not recommended, but I did it to support the wings, and well, enough said. The prop came from a Roden Fokker D7 that was supplied as a spare/alternative. The engine cowl was drilled. The tail planes were also pre drilled, but not taken any further, after the mess with the wings.


Finally the spars were added to the structure to finish. Still a lot to do, such as aerials and more wing supports. Also the undercarriage to build.


Intakes and exhausts added. The finished article below, with 2 crew for the diorama, sorted from my box of little men I don't know what to do with.


And now after a black undercoat, green base, dark wash and green drybrush.


The base will be a CD, which has been gritted ready for building up the base to show the crash landing/shooting down. The 2 figures will form part of the diorama. 


The paint job and base have been finished, leaving the figures to do. It's a basic paint job but will make a really good objective marker or table scenery. Feel quite pleased that I was able to make something of the fuselage and the odd bits in the shed. Time for the actual observation plane next.


Thursday 31 October 2013

A small town in Germany - Rapid Fire Modern

With my usual issues regarding actually getting to an actual game, a weeks holiday meant that I would have a game at last without heading off to work afterwards! Nick T was doing a display game at the Yeovilton Show with UK 6th Airmobile defending against a Warsaw Pact incursion into the North German Plain. The 6th Airmobile would be supported by Chieftains, and Lynxs and a Gazelle, the Soviets would have the full range of gear - Hinds Hips and a truly huge beggar that could carry a couple of London Buses.

The game would be a trial of the demonstration game to see how things would pan out rule wise. It would have a small platoon of 6th Airmobile, a HQ and 2 Scorpions. the Soviets would have rolling reinforcements starting with 2 companies of paratroopers - 2 platoons airmobile in Hips Mil8, 1 in BMD's, supported by 2 ASU85's and a Hind - Mil24. If the Soviets or Brits took a hammering reinforcements would appear etc to balance out and continue the game.

The Brits would deploy into the town to defend it against the Soviet attempt to secure the town and road junction. Deployment would be hidden, until spotted by the Soviets, or they moved out to the open/visible. A peculiar feature of Rapid Fire Modern would be the 'overwatch' ability to shoot in your opponents turn. This reflects ambush, readiness or even ineptness on the part of your opponent! Phew, sorry if that sounds a bit personal, what I really mean is the lack of coordination and tactical awareness by opposing troops. It's a very powerful tool to use, though you can only use it if you didn't fire in your turn prior to firing in your opponents turn. In point of fact it truly is a game changer, and if you are not used to this, its a shock.

So, from sitting at the side of the game, to observe, I became one of the Brits - Ian T was the other Brit. Colin was the acceptable face of  the workers paradise. 1 section was put into the treeline at the edge of the village, another section put into the hill/trees at the side of the road leading to the village, to ambush any traffic and support/flank the treeline. 2 81mm mortars were dug in, in the village, supported by the HQ. 2 GPMG's on tripod were split to support the 2 sections, with 2 Blowpipes spread either end of the sections, and 2 Scorpions in ambush/reserve. A Milan team secured the end of the treeline position to engage any vehicles assaulting the treeline.

The Soviets put the Hind on first, running up the table, to sniff out the opposition. All it sniffed out was the blowpipe team on the British right. Click, whirr, whooosh, and the Hind gets clipped and has to retire off the table for 1 turn. The start of the Soviet sense of humour failure. Next turn, the BMD's roll up, heading up the table, but debussing their troops first turn, 4 moves away from the wood alongside the road. Moving on, the Soviets move on up, waiting for the Hind to reappear, with 2 Mil8's full of troops, and the 2 ASU85's.

The Hind reappeared at the back of the table to shoot up the Blowpipe position, with the Hip's dropping off the troops just before it, one of the sections in short range of the GPMG and infantry section. OOuuchh. One of the Soviet sections is wiped out, the other taking the position.The Milan team then shot an ASU85, ripping it to pieces. By flanking the position in the treeline, the Soviets exposed the 2 Scorpions. Thus,bringing up the Hind to flank the treeline, another 2 Hip's turned up to continue the flanking manoevre. The 2 Scorpions turned to fire at the Hind, with one of them getting a critical hit on the Hind, removing it from play.


The BMD's and infantry, then swung across the road away from the wood alongside the road, to go for the treeline position that had been exposed, but exposing them to short range ambush by the Brits. The Brits opened up, wiping out a section and a half. The Soviets then proceeded to rollup the treeline position - the Brits trying to withdraw along the treeline into the village, but losing three quarters of the men. After the flank ambush, the Brits then attempted to withdraw, but losing three quarters of the men to a concentrated attack by the BMD's. This attack was a shining example of what rule systems seem to induce in wargamers as to how troops in the field actually behave/conduct themselves. Although it is possible to say that it is a point in time that is represented, its also equally valid to say that it is totally bonkers and with 20+ years experience in the British Army even more valid. The BMD's drove up to the position of the retreating Brits, swivelled 60' in the road, several yards away, and opened up with machine guns. Not concerned with hitting the troops with their main guns, or moving to contact unseen troops who have A.T.weapons in a wood (OK, its a Carl Gustav), and possibly blocking the road that they wished to secure.


The sweep up the flank of the treeline began to stall, but the reinforcements moved to sweep up the buildings along the back of the treeline, along the road. The Brits managed to bugout, pulling out the mortars, Scorpions and HQ. Only 6 infantry managed to get out, quite heavy casualties for the force involved. However, the Soviets took a pasting,losing 2 platoons, an ASU85, a damaged BMD and Hind helicopter.