 John had his Para's available, so the Orne Bridgehead and the operations by 6th Airborne Division in Normandy were a good fit. It also meant that I would be getting KGN out, and everyone playing was familiar with the rule mechanisms.
I had read quite a lot about the operations around the Orne and its significance to the drive on Caen, and what particularly caught my attention were the actions that 9th Parachute battalion fought in and around the Orne bridgehead. Not to dismiss in any way the actions of other units in 6th Airborne and 1st Special Service.
9th Para marched into its defensive positions at 1.30am on 7th June with 90 effectives, although its strength was slowly increasing as men made their way to the battalion after the drop and operations on the 6th June. The battalion dug in on the ridgeline southwest of Breville, protecting the north/northeast postion of 6th Airborne and the vital crossing of the Orne around Ranville. If the Germans were able to push through Ranville, they would have been able to directly attack the beach lodgements of the Allies and affect the whole of the Invasion. In any event, seizure of the ridgeline would allow domination of the Orne bridgehead, and the interior of 6th Airborne's positions.
Colonel Otway, officer commanding, gathered a scratch force of reserves and counterattacked the Germans who had secured positons on the ridgeline, throwing them off, back down to to Breville. The Germans suffered heavy losses during the attack, and counterattack.
I produced 2 briefings for the 2 sides, listing an operational briefing, force structure, deployment and objectives. The Paras list was drawn from the published list in Wargames Illustrated, the Grenadiers list from the German Infantry list in KGN
A company (reduced strength)
Company Command (platoon HQ squad command)
1st Platoon ( Inf squad )
2nd Platoon ( Inf squad )
B company ( reduced strength )
Company Command (platoon HQ squad command)
 1st Platoon ( Inf squad )
2nd Platoon ( Inf squad )
2 x HMG teams
2 x Piat teams
1 x FAO
Dedicated off table artillery - x3 3inch mortars
2 x high priority requests
2 x low priority requests
Defences
6 x Foxholes ( each to provide hard cover for 1 squad or team )
4 x Barricades ( each to provide hard cover for 1 squad or team )
Off table reinforcements for game move 10
C company ( reduced strength )
Company Command (platoon HQ squad command without 2inch mortar)
1st Platoon ( Inf squad )
2nd Platoon ( Inf squad )
Morale 26 (36 when reinforcements are on table)
British objectives were to hold the ridgeline and so stop the Germans from winning, Germans were to get a Command group onto the ridgeline and/or occupy 50% or more of the Defences. The German Command group would need to call in an artillery priority request, so would need to be unpinned for their turn. Aircraft morale chit markers are replaced and another morale chit marker drawn.
Company command (battle group command)
1st Platoon (HQ command squad)
1st Inf squad
2nd Inf squad
3rd Inf squad
3 x MMG teams
2nd Platoon (HQ command squad)
 1st Inf squad
2nd Inf squad
3rd Inf squad
3 x MMG teams
StuGIIIF Squadron
StugIIIF (command)
2 x StuGIIIF
2 x HMG teams
2 x 80mm mortar teams
1 x FAO team
Dedicated off table artillery - x3 120mm mortars
4 x low priority requests

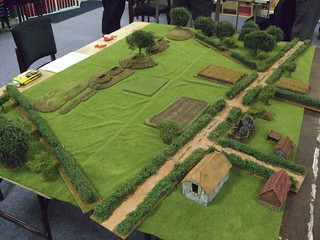
The terrain was laid out as follows. The woods to the left lead to Chateau le Come, and the 1st Canadians, the woods to the right are a feature between 9th Para, and 6 Commando from 1st Special Service. There were not enough Paras to deploy up to 6 Commando, and the defences on the ridgeline show this. The Paras are not allowed to deploy in the most lefthand side of the table - 12inches from edge. The British chose not to extend their defences into the lefthand wood.
 The Paras deployed first, followed by the Germans. the Germans were allowed to deploy up to 24 inches from the table edge, with no restrictions. The hedges were visual cover, and obscured target for spotting, but were for representation only. They marked the edge of the woods,whilst the hedges on the roads would not affect things. The road running accross the table is the Breville to Amfreville road, and the buildings at the road junction, the edge of Breville village.
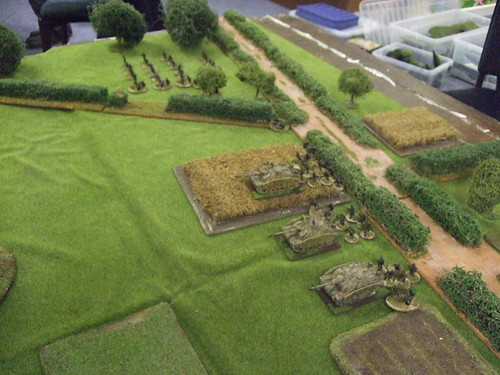
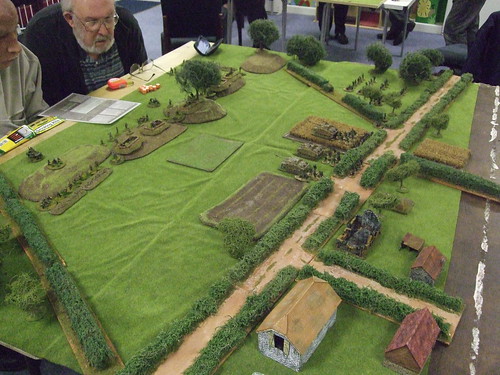 The Germans deployed their StuG's in the centre, supported by a platoon of Grenadiers, the FAO and mortars at the junction of the road and the northern woods, the other platoon of Grenadiers in the wood. The British deployed their 2 platoon groups in the defences running along the ridgeline, with a HMG on their far right and another placed in the middle next to the tree, between the 2 platoons.
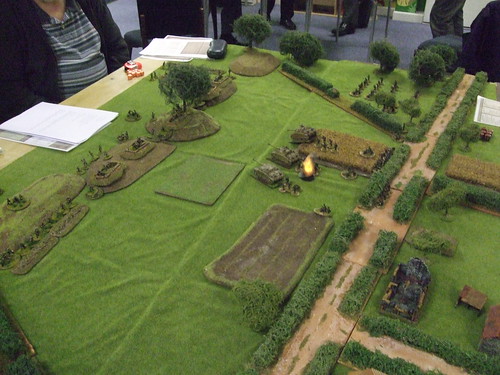
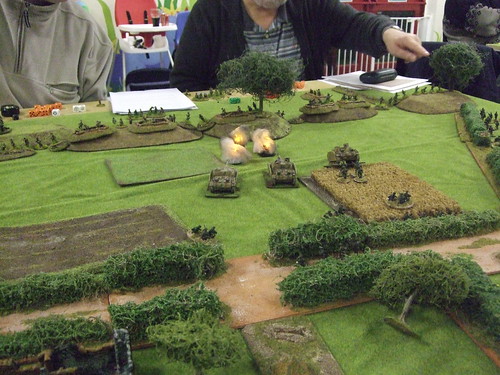
The Germans moved forward, with some poor shooting by the StuG's, the Para's responded with a stonk of 2inch mortar fire onto a squad of Grenadiers behind the middle StuG. Time to get a tealight explosion marker out. There was not much response with the Paras as their action dice were appaling. The Grenadiers were suppressed.
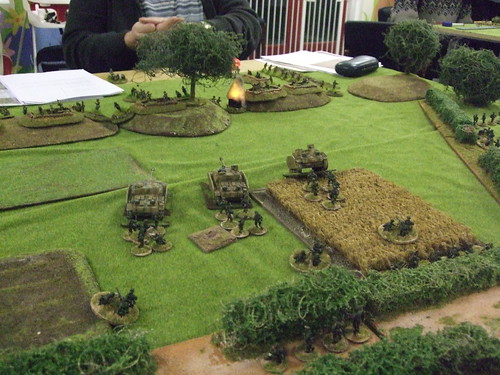 The Germans get on moving on their right, the StuGs stop to engage the lefthand side of the Paras, this is where the Grenadiers will be aiming to break in, at the dogleg. The Germans also start to shoot in with their HMGs, firing from the edge of the northern wood. A high explosive round hits and wipes out the HMG Vickers team.
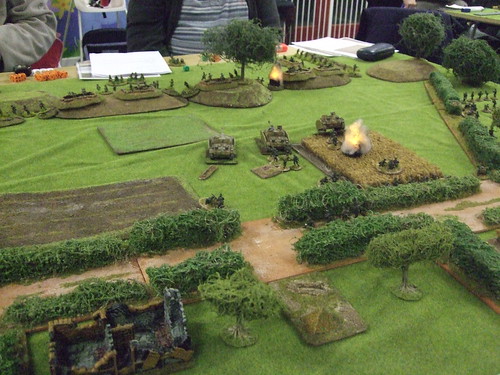 More British mortar fire is coming in, along with rifle fire from the Infantry squads.The Germans are hitting the Paras, but the Paras are surviving dueto the Foxholes. However, nearly everyone is shooting Direct Fire. More later on this. The Paras are giving the Grenadier platoon behind the StuGs a very hard time, with the HMG killing the entire squad behind the lefthand StuG, the centre squad pinned, and the righthand squad now under mortar fire. They pass their concealment rolls.
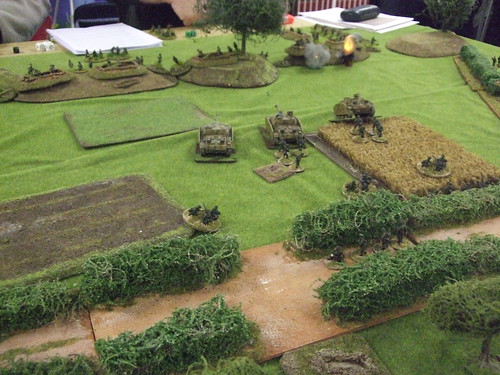
The germans continue to fire at the line, pinning one of the sections of Paras with HMG fire, and hitting the adjacent section at the dogleg with direct fire HE. The ammo situation is getting quite low for the StuGs, 2 on 2 shots left, 1 on 3. They start off on 5 shots each of HE. The Germans also managed to get their off table mortars into action, doubly suppressing the section of Paras on the dogleg of the line.

The Germans have taken a few casualties off each Para platoon, but not enough to stop the fire coming in, or to suppress the observers bringing in the off table and on table mortar fire. The Paras have 2 2inch mortars with their HQ squads. Mortar fire bracketts the righthand StuG, but the germans behind survive. The line of bullets mark the end of the suppressed squad of Grenadiers behind the StuG, who were taken out by the Paras surviving HMG

The Paras have also started to move up on their left, moving a squad out of their defences, onto the ridgeline, to defend the line against the Germans moving up through the woods. This will make them more vulnerable to mortar or artillery fire if it can be called down on them.
At the bottom of the picture is a german objective marker I made for BGK/BGN, a zeltbahn tent with large foxhole. WW2 whimsey!
 A last gasp effort with their off table artillery, and 3 3inch mortars come crashing down on the StuGs. Hold on, did you roll 4, with the scatter dice pulling the target point back onto the Para line, and I rolled 13. Roll to suppress your troops. All 3 rolls were on the suppression table, and everyone passed concealment saves!
Well, all good things must come to an end, and as the clock had gone past ten, and snow was forecast, we decided to call it a night. Ilchester is lovely, but 19 miles of country lane, ice and snow madness were not what was wanted. The Brits had 5 total in morale counters against the German 4. A draw with a slight leaning to the Brits, although I think the Germans could have got their objectives, if we had played on, and were prepared to kip overnight at the club! Thanks to John ( German and supplier of the Paras ), Michael and Ian ( British ).
No comments:
Post a Comment